In a lot of situations, you might not notice or really care, but if the way it shows numbers that are below zero is a problem, then you may be wondering how to change the Windows 7 negative number format. Fortunately, this is an option that you can adjust, and it’s found on a menu that contains a bunch of other useful settings.
How to Switch the Way Windows 7 Displays Negative Numbers
Our guide continues below with additional information on how to change the Windows 7 negative number format, including pictures of these steps. If you deal with negative numbers on a regular basis on your Windows 7 computer, then you have probably become accustomed to the way that they are displayed. However, you might not be aware that you can change the format of this display to something that you prefer more. There is actually an option in your Windows 7 Control Panel that allows you to change the Windows 7 negative number format to one of several different options. This is performed on the same menu where you can also change the default delimiter or list separator for Windows 7. Customizing settings like these are a great way to improve your experience with your computer, particularly if many of your daily tasks revolve around the options that this menu allows you to modify. Our tutorial on how to convert inches to MM in Excel can show you how to fix issues that you might be having with the way that Excel handles various units of measurement.
Choose A Different Windows 7 Negative Number Style (guide with Pictures)
Changing the Windows 7 negative number format will affect all of the programs that use this information to display their data. While many of the formatting and display options in Windows 7 programs can be changed from directly with those programs, this is one situation where that adjustment must be performed in Windows 7 instead.
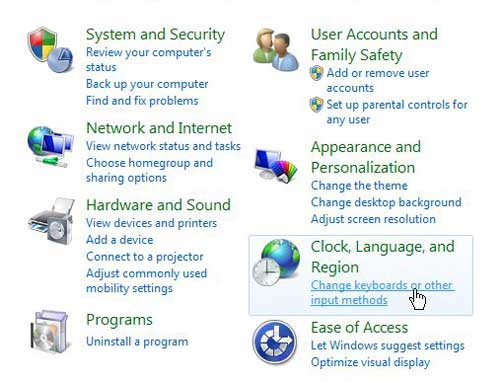
Step 1: Click the Start button at the bottom-left corner of the window, then click Control Panel.
Step 2: Click the Change Keyboards or Other Input Methods link in the Clock, Language and Region section of the window.
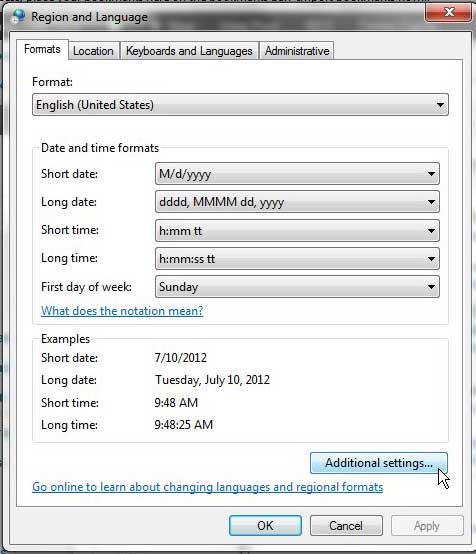
Step 3: Click the Format tab at the top of the window, then click the Additional Settings button at the bottom-right corner of the window.
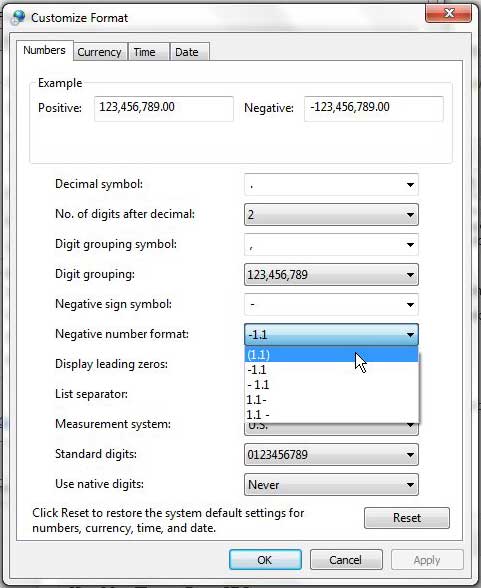
Step 4: Click the Negative Number Format drop-down menu, then choose your desired negative number format.
Step 5: Click the Apply button, then click the OK button.
Now that you know how to change the Windows 7 negative number format you will be able to adjust this setting in the future if your numbers are being displayed the wrong way. The next time you open a Windows 7 program that utilizes the negative number settings and you are handling negative numbers, it will display in the format that you just selected. Note that this menu contains a lot of other settings that you might want to change, such as the list separator, digit grouping, standard digits, decimal symbol, and much more.
Additional Sources
After receiving his Bachelor’s and Master’s degrees in Computer Science he spent several years working in IT management for small businesses. However, he now works full time writing content online and creating websites. His main writing topics include iPhones, Microsoft Office, Google Apps, Android, and Photoshop, but he has also written about many other tech topics as well. Read his full bio here.