The Excel default font has changed a couple of times over the course of its existence and, in most new versions, the Excel default font is called Calibri. While many people won’t take issue with this font, you might prefer to use something other than Microsoft’s choice when you are creating new workbooks. Luckily you have the ability to customize many features of the program in the Excel Options menu, including things like the default font and font size. Our guide below is going to show you where to find this setting in Excel for Office 365 so that you can select a new default font for the Excel workbooks you create in the future.
Excel – Change Default Font
Our article continues below with additional information on changing default font in Excel, including pictures of these steps.
How to Change Default Font in Excel for Office 365 – Guide with Pictures
The steps in this article will work in most versions of Microsoft Excel, including Excel 2010, Excel 2013, Excel 2016, Excel 2019, and more. The Calibri font is the default in most newer versions of Excel, but it may be different in older versions, or if this setting has previously been changed. Excel is going to need to restart after you choose a new default font style, so it’s best to save your file before completing these steps.
Step 1: Open Microsoft Excel.
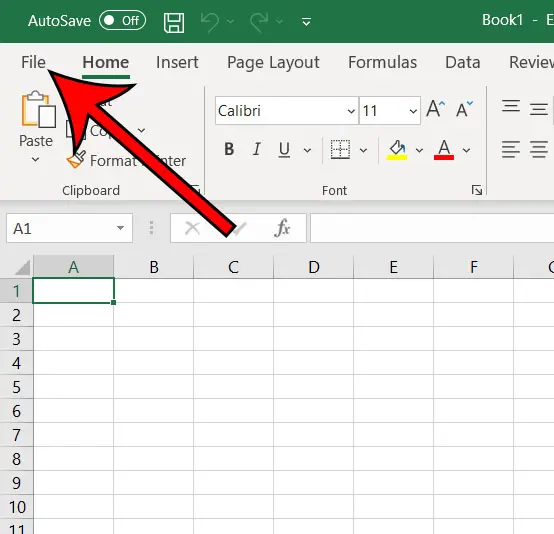
Step 2: Select the File tab (next to the Home tab) at the top-left corner of the window.
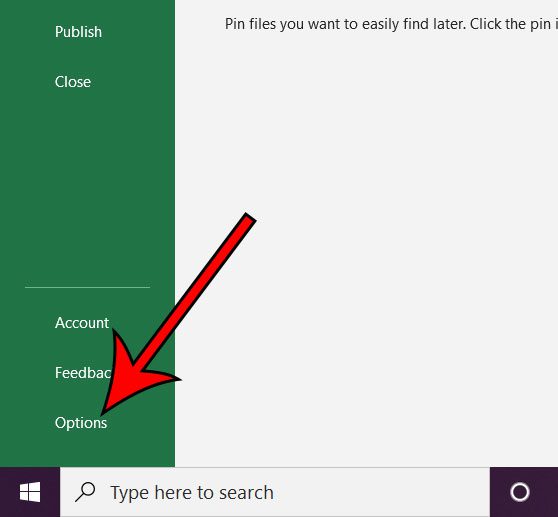
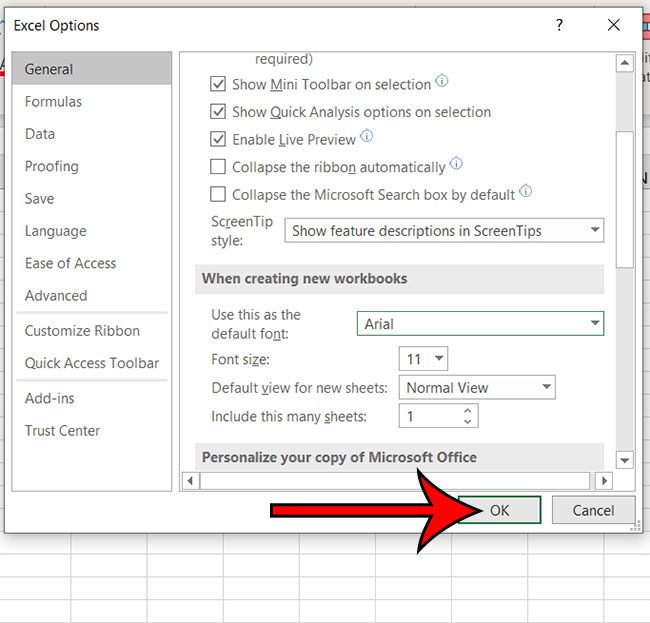
Step 3: Click the Options button at the bottom-left corner of the window.
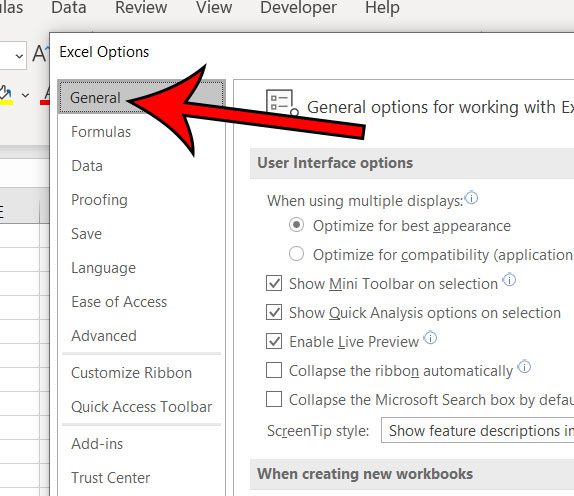
Step 4: Choose the General tab at the left side of the Excel Options window.
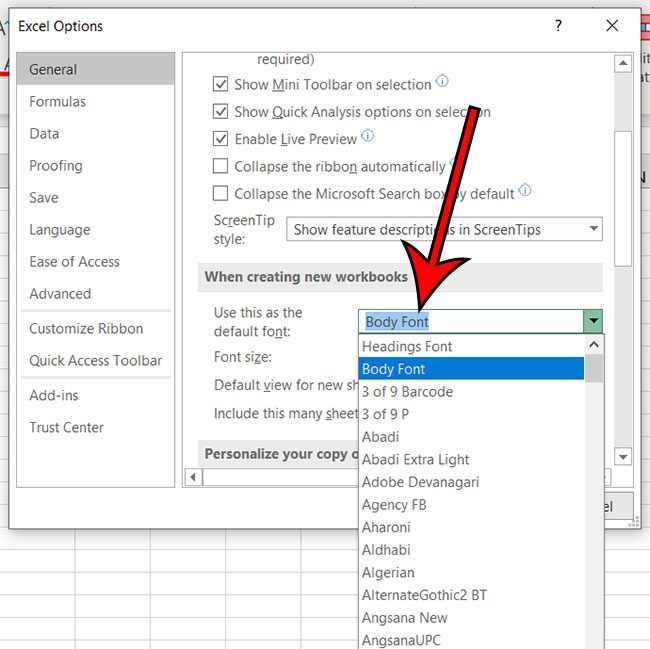
Step 5: Click the drop-down list to the right if Use this as the default font, then choose an option.
Step 6: Click the OK button at the bottom of the window when you’re done.
Note that Excel will need to restart to apply the new font setting.
Can I Change the Default Font from the Ribbon?
The steps in the section above require you to go to the Excel Options dialog box, which is accessed through the File tab. This menu provides you with the ability to make a number of changes to the way that your Microsoft Excel installation behaves on your computer. You can not only change the default font, but you can also change the default file type for new files, change when workbook calculations occur, and much more. Since changing the default font requires a few more steps than a lot of the other formatting changes you might make to your new workbook, you may be wondering if there is another way to apply the font you want to future new workbooks. Unfortunately, the only way to change the default font setting in Excel is by going through the Excel Options window. You aren’t able to make this adjustment for future files through the navigation ribbon.
Excel Default Font Additional Information
The Excel default font in most newer versions of Excel, including Excel 2016, Excel 2019, and Excel for Office 365, is called Calibri.You can change the default font in Excel to any other font that is currently installed on your computer.You can install a new font by downloading it, then right-clicking on the font file and choosing the Install option. Note that if your font file came in a zip file that you will need to unzip it first.
The default font settings only apply to new workbooks that you create. The font will not change for existing workbooks on your computer.While you have the menu above in the Excel Options dialog box you can also change the default font size as well.Note that changing the default font in Excel won’t affect the default font in other Microsoft Office applications like Microsoft Word or Microsoft Powerpoint. Those applications have their own default font settings that you can adjust in a similar manner.
You can apply a new font to existing cells in a spreadsheet by selecting the cells that you would like to modify, then clicking the Font drop down menu and choosing a new font. The Font dropdown is found on the Home tab in Excel. You can also change the font size or apply some additional font formatting using the additional buttons and settings in the Font section of the ribbon. As mentioned above you will need to restart Excel for the new font setting to take effect. One of the other default options you can modify is the number of sheets that are in each new workbook. If you find that you are usually deleting a worksheet or two whenever you create a new file, then electing to start with a lower number of sheets may be a good decision. Find out how to remove gridlines in Microsoft Excel if you either don’t want to see them on your screen, or you don’t want to see them when you are printing.
Additional Sources
After receiving his Bachelor’s and Master’s degrees in Computer Science he spent several years working in IT management for small businesses. However, he now works full time writing content online and creating websites. His main writing topics include iPhones, Microsoft Office, Google Apps, Android, and Photoshop, but he has also written about many other tech topics as well. Read his full bio here.
You may opt out at any time. Read our Privacy Policy